Installation
Requirements
| Revit Version | Supported | Notes |
|---|---|---|
| Revit 2025 and above | ✅ | Use the Revit2025Plus folder from the ZIP |
| Revit 2024 and below | ✅ | Use the Revit2024 folder from the ZIP |
- Claude Desktop (latest)
What's in the ZIP
revit-claude-connector-vX.X.X.zip
├── Revit2025Plus/                            ← For Revit 2025 and above (.NET 8)
│   ├── RevitClaudeConnector.addin
│   ├── RevitClaudeConnector/
│   │   ├── RevitClaudePlugIn.dll
│   │   ├── BuiltInTools.dll
│   │   └── ...
│   └── server/
│       └── Revit.Claude.Connector.Mcp.Server.mcpb
├── Revit2024/                                ← For Revit 2024 and below (.NET Framework 4.8)
│   ├── RevitClaudeConnector.addin
│   ├── RevitClaudeConnector/
│   │   ├── RevitClaudePlugIn.dll
│   │   ├── BuiltInTools.dll
│   │   └── ...
│   └── server/
│       └── Revit.Claude.Connector.Mcp.Server.mcpb
└── INSTALL.md
Step 1 — Install the Revit Plugin
Important — Unblock the ZIP before extracting
Windows marks files downloaded from the internet as blocked, which will cause Revit to throw an exception when loading the plugin. Before extracting, right-click the ZIP file → Properties → check Unblock at the bottom → click OK.
Open File Explorer and navigate to your Revit add-ins folder. Replace
20XXwith your Revit version:%APPDATA%\Autodesk\Revit\Addins\20XX\(Paste that path directly into the File Explorer address bar)
From the ZIP, open the folder that matches your Revit version:
- Revit 2025 or above → use
Revit2025Plus/ - Revit 2024 or below → use
Revit2024/
- Revit 2025 or above → use
Copy both of the following from your chosen folder into the add-ins directory:
RevitClaudeConnector.addinRevitClaudeConnector\(the entire subfolder)
The final layout should look like:
%APPDATA%\Autodesk\Revit\Addins\20XX\
├── RevitClaudeConnector.addin
└── RevitClaudeConnector\
    ├── RevitClaudePlugIn.dll
    ├── BuiltInTools.dll
    └── ...
Launch (or restart) Revit. A Claude Connector tab will appear in the ribbon.
Step 2 — Install the MCP Server
- Open Claude Desktop.
- Go to Settings → Extensions (or drag and drop the
.mcpbfile onto the Claude Desktop window). - Select
server/Revit.Claude.Connector.Mcp.Server.mcpbfrom your chosen variant folder and confirm the installation. - Restart Claude Desktop when prompted.
In Claude Desktop, you can now ask Claude to query and manipulate your Revit model.
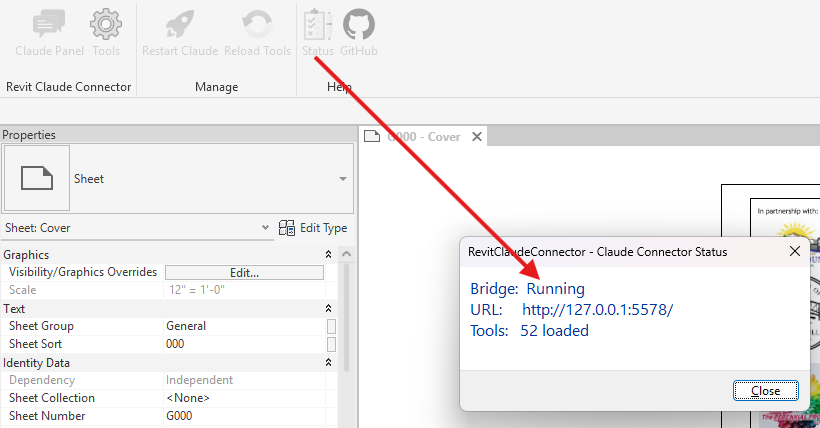
NOTE: Once both the plugin and the MCP server are installed, open Revit and click the Status button in the Claude Connector ribbon tab. The status should read Running.
Troubleshooting
| Problem | Fix |
|---|---|
| Plugin doesn't appear in Revit | Verify the .addin file and RevitClaudeConnector\ folder are both in the correct Addins\20XX\ directory |
| MCP server not connecting | Ensure Claude Desktop has been restarted after the extension was installed |
| Revit shows a security warning | Click Always Load to trust the add-in |